Potting Up has a new address!
My blog is now to be found on the brand-new Whichford Pottery website, at http://www.whichfordpottery.com/potting-up/
I do hope you will follow me there. There is a new post waiting for you and, once I have got used to the new format I intend to keep posting every 7-10 days, with plenty of photos, ideas and a window on Whichford.
Hopefully it will be easier to follow the blog regularly and to comment - please let me know via the blog or at harriet@whichfordpottery.com if you have a problem.
You can also find me on Twitter - @HarrietRycroft, and on Flickr too.
I look forward to talking to you!
Bye for now,
Harriet
Head Gardener, Whichford Pottery
Wednesday, 9 May 2012
Wednesday, 11 April 2012
Subtle and unsubtle spring bulbs - take your pick!
My good news is that after about a month and a half my camera is back from the menders. Not in perfect working order but it'll do for the moment. I was watching spring roll past me unrecorded and it was driving me crazy.
So this week I'm not going to write too much, I'm going to squeeze in as many photographs (all taken this week) as possible because the spring starting gun was fired a few weeks ago and if we don't get a move on we'll get left behind.
Crumbs of comfort
Today I ate my lunch as usual on the bench in the courtyard garden, I kept my camera with me because two robins and two dunnocks had been skittering about. The dunnocks disappeared (they don't like publicity) but the two robins shared my bread and one of them kindly posed on a pot. It's one I planted with alpines at the end of March when I went to talk to the friendly people at Kennington Horticultural Society near Oxford.
Top heavy
White-ish
Most white narcissi have a tinge of yellow or green about them, I prefer these teamed with strongly contrasting colours like blue or red. If you are going all Sissinghurst and choosing white tulips to go with them try T. 'White Parrot' because the young tepals have a hint of yellowish green on their pleasantly wrinkly backs.
Very few 'white' flowers are purely so. Even the pear blossom coming out this week has a tinge of pink.
Growing stronger
I keep meaning to dig out the white hyacinths that escaped into one of the borders years ago because they usually just look a mess. But they looked quite fresh the other day with the cowslips, and the little mauve auricula in a Jekyll pot. Perhaps I'll leave them for now.
My hunger for stronger colours is beginning to be assuaged by tulips. T. 'Uncle Tom' is looking plump, glossy and promising, 'Jan Reus' is as gorgeous as ever and I am very pleased with the sample of T. 'Big Chief' which René sent us, it's a sturdy tulip in a toothsome colour which I would like to try again.
Purple wave
In the courtyard garden one of the most reliable tulips, 'Negrita', is oozing purpleness from its perch on top of the well. No matter which tulip I plant in this pot I always enjoy watching the wave of colour run from the south-western side of this huge pot round to the shadier northern side until it can be seen from every angle.
Someone to look up to
Playing with pots means that you can gaze lovingly up at some of your favourite plants. Here's Fritillaria imperialis 'Rubra Maxima' in a large Lemon Pot made and decorated for Trinity Hall, Cambridge, on display by the doors into the main pottery building.
Winner!
My love of spring bulbs is fed regularly from The Netherlands by René Zijerveld, he is fond of our pots too, and recently emailed me this picture of his prize-winning Tulipa schrenkii in a Whichford basket pot. Congratulations René!
Drip, drip, drop little April showers
I must go now - but before I do here's a picture showing yet another April shower (hurray!) on its way to Whichford Pottery this week.
So this week I'm not going to write too much, I'm going to squeeze in as many photographs (all taken this week) as possible because the spring starting gun was fired a few weeks ago and if we don't get a move on we'll get left behind.
 |
| One of our robins pauses for thought in a pot full of alpines |
Crumbs of comfort
 |
| Narcissus 'Bridal Crown' and Pansy 'Frizzle Sizzle Twizzle' in a Pastry Pot at the entrance to Whichford pottery |
Top heavy
After a ridiculously warm March, April has brought hosepipe bans for many - and showers for most, so bulbs are throwing flowers up with gay abandon wherever you look. The crocuses and little irises have been and gorn but we still have lots of Narcissus on the go. N. 'Bridal Crown' was a sample from René, it's quite sweet and frothy, but I'm not terribly keen on double narcissi, they are a bit too blobby for me and they fall over too easily.
Narcissus 'Minnow', on the other hand, is one of my favourites, a cluster of tiny, soft yellow, simple flower heads at the top of each stem.
Tasteful?
White narcissi are always popular at our annual bulb sale, I sometimes suspect that this may be because some people think white is classier than yellow. This is a shame because yellow is delightful in the slanting spring sunlight among fresh, bright foliage.
White can be quite hard to use at this time of year because it can look a bit cold and bloodless, but I find if you use it in bulk it looks best. Perhaps I just don't "do subtle" very well.
 |
| Narcissus 'Minnow' in the courtyard garden at Whichford Pottery |
White narcissi are always popular at our annual bulb sale, I sometimes suspect that this may be because some people think white is classier than yellow. This is a shame because yellow is delightful in the slanting spring sunlight among fresh, bright foliage.
White can be quite hard to use at this time of year because it can look a bit cold and bloodless, but I find if you use it in bulk it looks best. Perhaps I just don't "do subtle" very well.
 |
| From left to right : Narcissus actea 'Pheasant's Eye', N. 'Jenny' and N triandrus 'Thalia'. The little flashes of blue you can just see are Pansy 'Moonlight Mix' and Muscari latifolium. |
 |
| Tulipa 'White Parrot' in Whichford stock yard Not utterly white. |
Most white narcissi have a tinge of yellow or green about them, I prefer these teamed with strongly contrasting colours like blue or red. If you are going all Sissinghurst and choosing white tulips to go with them try T. 'White Parrot' because the young tepals have a hint of yellowish green on their pleasantly wrinkly backs.
Very few 'white' flowers are purely so. Even the pear blossom coming out this week has a tinge of pink.
 |
| Blossom in the seconds field at Whichford Pottery |
 |
| An auricula in a Whichford Jekyll Pot among cowslips and white hyacinths |
I keep meaning to dig out the white hyacinths that escaped into one of the borders years ago because they usually just look a mess. But they looked quite fresh the other day with the cowslips, and the little mauve auricula in a Jekyll pot. Perhaps I'll leave them for now.
My hunger for stronger colours is beginning to be assuaged by tulips. T. 'Uncle Tom' is looking plump, glossy and promising, 'Jan Reus' is as gorgeous as ever and I am very pleased with the sample of T. 'Big Chief' which René sent us, it's a sturdy tulip in a toothsome colour which I would like to try again.
 |
| Plump and glossy, Tulipa 'Uncle Tom' |
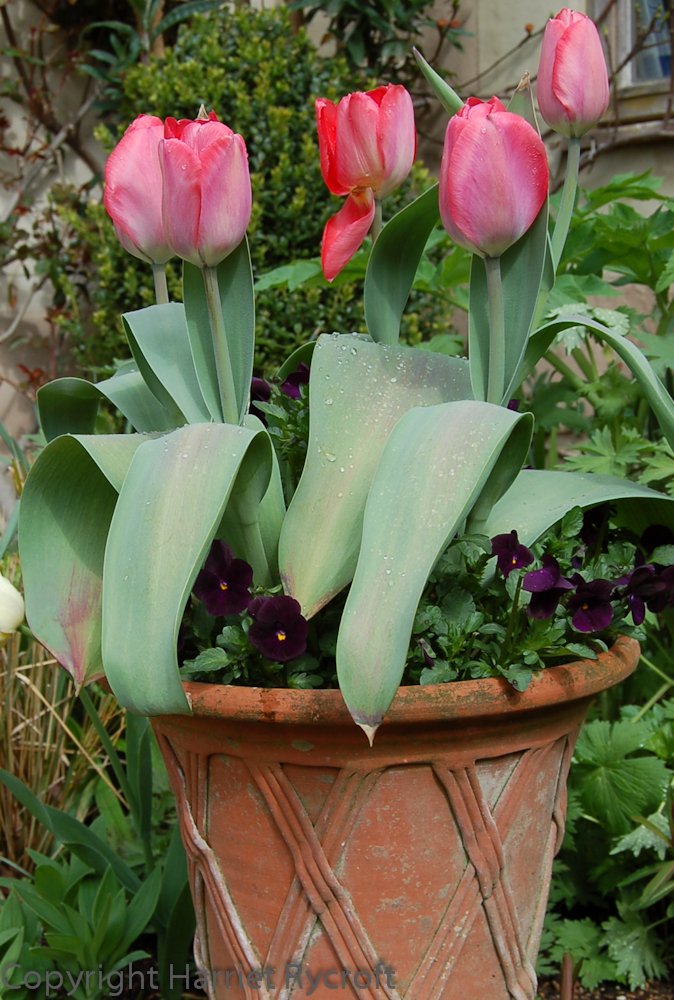 |
| Tulipa 'Big Chief' in a Whichford Basket Lily Pot |
Purple wave
In the courtyard garden one of the most reliable tulips, 'Negrita', is oozing purpleness from its perch on top of the well. No matter which tulip I plant in this pot I always enjoy watching the wave of colour run from the south-western side of this huge pot round to the shadier northern side until it can be seen from every angle.
 |
| Tulip 'Negrita', Narcissus 'Hawera' and Viola 'Jester Mix' in the giant Orange Pot on the well in the garden at the pottery |
 |
| Looking up into Fritillaria imperialis |
Playing with pots means that you can gaze lovingly up at some of your favourite plants. Here's Fritillaria imperialis 'Rubra Maxima' in a large Lemon Pot made and decorated for Trinity Hall, Cambridge, on display by the doors into the main pottery building.
 |
| Fritillaria imperialis 'Rubra Maxima' and wallflowers in a Trinity Hall Lemon Pot |
Winner!
My love of spring bulbs is fed regularly from The Netherlands by René Zijerveld, he is fond of our pots too, and recently emailed me this picture of his prize-winning Tulipa schrenkii in a Whichford basket pot. Congratulations René!
 |
| René Zijerveld's Tulipa schrenkii in a Whichford shallow Basket Pot |
Drip, drip, drop little April showers
I must go now - but before I do here's a picture showing yet another April shower (hurray!) on its way to Whichford Pottery this week.
 |
| Spring foliage glows as dark blue shower clouds gallop up to Whichford Pottery |
Friday, 30 March 2012
Some like it hot, many aren't too fussy.
To follow on from my last post about efficient use of water in pots I wanted to give you a glimpse of the way I decide where to position which plants during the summer. These are just my opinions, based on a lot of trial and error (and in this space I can't provide a comprehensive guide) but they may be useful to those of you who are wondering how they are going to keep your potted plants happy in a difficult year. If you are a beginner at this please don't be afraid to try, and to make errors. You may marmalise a few plants along the way but if you observe them carefully and if necessary move them, there will be few fatalities...
Where is your pot?
Pots on their own, in a hot, dry location such as our stock yard, are difficult, especially if they are raised up and exposed to more drying wind. Succulents and a good inch of gravel mulch are the answer.
Even in the relatively lush courtyard garden, a pot by itself with a plant that requires plenty of water (such as this Dahlia Gallery 'Rivera', left) must be near a path where you will see it regularly, so that you can pounce on it if it starts to wilt. Try to keep it in part shade.
Over exposure
The Ham House Urns in the drive may be on the northern side of the hedge but they are exposed to the drying wind and too far away to water regularly.
I have had success with mixed plantings there with much lugging of watering cans. In the last two years, however, I have simply filled the pots with succulents and left them to it. No watering at all from early June to October, when they were dismantled.
In an exposed position you can mix large succulents, especially aeoniums, with other plants such as pelargoniums, cordylines and phormiums which revel in large dollops of sunshine and are fine with occasional dryness.
Shady deals
Many bedding plants which are often recommended for hanging baskets are surprisingly intolerant of drying. Lobelia and Nemesia for instance, may not die immediately but they will soon sulk, stop producing flowers, and keel over earlier than necessary. Many bedding Verbena will be susceptible to powdery mildew if allowed to get too dry too. Give them good light, but shelter from the wind and the hottest sunshine of the day.
As for the smallest pots - well, in sunny positions I only put succulents in them for high summer. That way most of them won't need watering at all. If you have a collection of smallish to medium pots it's best to favour plants labelled 'drought tolerant' because even in a shady position it is easy to forget them and let them dry out - at least these pots have the advantage of being dunkable. Just put them in a tub of water which comes half-way up their sides for an hour or so, but don't forget them and leave them to drown!
Bring me sunshine
As mentioned in the last post I group the pots together for maximum humidity/coolness, but something has to go in the front row. Apart from succulents I often choose Agapanthus or Nerine for this role as they enjoy a good baking.
Drought tolerant/sun-loving plants often have grey or blue foliage, the heat-stress avoidance techniques associated with this colour include waxy coating on the leaves or a layer of fine hairs. Luckily for us gardeners this makes a tasteful selection of foliage in a sunny spot pretty easy at the same time as being water-efficient. Try plants like Cerinthe major 'Purpurascens', Astelia chathamica 'Silver Spear', Elymus arenarius, Festuca glauca, Lavandula x christiana, Argyranthemum foeniculaceum, Dichondra micrantha 'Silver Falls', Convolvulus cneorum and Convolvulus sabatius.
...and only sunshine.
Of course many of the sun-lovers won't flower well in shade. Plumbago auriculata and the pelargoniums, for example, need good light to flower profusely. Convolvulus cneorum/sabatius, Osteospermum and Gazania flowers will stay sullenly closed in deep shade, and don't even think about putting Ipomoea tricolor (Morning Glory) in shade. Of course that doesn't mean that the bases of these plants need to be exposed to sun, so you can crowd other plants in to shade the surface of the planting and minimise evaporation.
Counter-intuitive
Nasturtiums (Tropaeolum majus) flower surprisingly well in shade. I have used them in indoor flower shows in Japan and they were unique in flourishing and flowering with NO natural light in a department store! They will cascade just as happily over the shady side of a large pot as over the sunny one, so this is something to bear in mind if you are trying to save water by keeping most of your pots in shadier locations than usual. Petunias will be all right in part shade, too, and Nicotiana.
Some plants deserve to be popular
There are quite a few plants which will happily flower in shade. This year we are denied bedding busy lizzies (fine if you choose the colours carefully, don't be snobbish!) because of a plague of downy mildew, but I cherish my plants of their huge perennial cousin Impatiens sodenii, a fleshy giant with white flowers which reaches 5-6ft tall given the chance. There are lots of good begonias and beautiful fuchsias too - don't let the fashion police deter you - which will flower well in the shade.
Of course all your foliage plants can be stuffed into shady corners to save water - but beware of putting snail food, like hostas, close to walls, as hungry molluscs will abseil down, grateful that they don't have to crawl over rough terracotta for their supper.
Undeniable thirst
Some thirsty plants, especially those grown for fruit such as strawberries, tomatoes and blueberries, work best with some sun at least so it is worth sitting their pots in saucers to catch any water draining out. But if the forecasts are wrong and it rains a great deal only the blueberry will be happy with its feet constantly damp.
Think before you plant
I have a wide-ranging collection of plants, and I'm not about to chuck them out because watering will be more difficult this year. But I am going to think very carefully about where to put them. It may be that many of them will have to be be in shadier places than is ideal, so perhaps they will produce fewer flowers, but at least I'll still have them when/if our climate regains its sangfroid.
 |
| Succulents with their feet under terracotta gravel can take the heat. July 2007. |
 |
| A basket of dahlias by itself - you'll need to keep an eye on it... Sept 2009 |
Pots on their own, in a hot, dry location such as our stock yard, are difficult, especially if they are raised up and exposed to more drying wind. Succulents and a good inch of gravel mulch are the answer.
Even in the relatively lush courtyard garden, a pot by itself with a plant that requires plenty of water (such as this Dahlia Gallery 'Rivera', left) must be near a path where you will see it regularly, so that you can pounce on it if it starts to wilt. Try to keep it in part shade.
 |
| June 2008. Conventional mixed planting in a Ham House Urn in the drive of the pottery. Watering cans needed regularly. |
Over exposure
The Ham House Urns in the drive may be on the northern side of the hedge but they are exposed to the drying wind and too far away to water regularly.
 |
| Sept 2011. Succulents in Ham House Urn in the drive of the pottery. No watering necessary! |
I have had success with mixed plantings there with much lugging of watering cans. In the last two years, however, I have simply filled the pots with succulents and left them to it. No watering at all from early June to October, when they were dismantled.
 |
| Aeonium arboreum 'Zwartkop' on top of the well with Pelargonium 'Duke of Edinburgh' and Cineraria maritima 'Cirrus' doing fine but the Lobelia and Verbena are struggling. Sept 2007 |
In an exposed position you can mix large succulents, especially aeoniums, with other plants such as pelargoniums, cordylines and phormiums which revel in large dollops of sunshine and are fine with occasional dryness.
Shady deals
Many bedding plants which are often recommended for hanging baskets are surprisingly intolerant of drying. Lobelia and Nemesia for instance, may not die immediately but they will soon sulk, stop producing flowers, and keel over earlier than necessary. Many bedding Verbena will be susceptible to powdery mildew if allowed to get too dry too. Give them good light, but shelter from the wind and the hottest sunshine of the day.
 |
| Agapanthus like a front row seat for sunshine. I think this is 'Bluety'. July 2007 |
Bring me sunshine
As mentioned in the last post I group the pots together for maximum humidity/coolness, but something has to go in the front row. Apart from succulents I often choose Agapanthus or Nerine for this role as they enjoy a good baking.
 |
| Astelia chathamica 'Silver Spear', Plumbago auriculata, Convolvulus cneorum and Convolvulus sabatius thriving in a south- facing site and a big Wisley Gardener Pot September 2009 |
...and only sunshine.
Of course many of the sun-lovers won't flower well in shade. Plumbago auriculata and the pelargoniums, for example, need good light to flower profusely. Convolvulus cneorum/sabatius, Osteospermum and Gazania flowers will stay sullenly closed in deep shade, and don't even think about putting Ipomoea tricolor (Morning Glory) in shade. Of course that doesn't mean that the bases of these plants need to be exposed to sun, so you can crowd other plants in to shade the surface of the planting and minimise evaporation.
 |
| Ipomoea tricolor 'Heavenly Blue' with its head in the sun of the entrance to Whichford Pottery but its toes under lots of other plants. July 2010 |
Nasturtiums (Tropaeolum majus) flower surprisingly well in shade. I have used them in indoor flower shows in Japan and they were unique in flourishing and flowering with NO natural light in a department store! They will cascade just as happily over the shady side of a large pot as over the sunny one, so this is something to bear in mind if you are trying to save water by keeping most of your pots in shadier locations than usual. Petunias will be all right in part shade, too, and Nicotiana.
 |
| Tropaeolum majus (nasturtium) on the northern side of the entrance arch. July 2009 |
 |
| Fuchsia 'Bornemann's Beste' flowering well in deep shade by the staff room, petunias and pelargoniums are managing too. Sept 2010 |
There are quite a few plants which will happily flower in shade. This year we are denied bedding busy lizzies (fine if you choose the colours carefully, don't be snobbish!) because of a plague of downy mildew, but I cherish my plants of their huge perennial cousin Impatiens sodenii, a fleshy giant with white flowers which reaches 5-6ft tall given the chance. There are lots of good begonias and beautiful fuchsias too - don't let the fashion police deter you - which will flower well in the shade.
Of course all your foliage plants can be stuffed into shady corners to save water - but beware of putting snail food, like hostas, close to walls, as hungry molluscs will abseil down, grateful that they don't have to crawl over rough terracotta for their supper.
Undeniable thirst
Some thirsty plants, especially those grown for fruit such as strawberries, tomatoes and blueberries, work best with some sun at least so it is worth sitting their pots in saucers to catch any water draining out. But if the forecasts are wrong and it rains a great deal only the blueberry will be happy with its feet constantly damp.
Think before you plant
I have a wide-ranging collection of plants, and I'm not about to chuck them out because watering will be more difficult this year. But I am going to think very carefully about where to put them. It may be that many of them will have to be be in shadier places than is ideal, so perhaps they will produce fewer flowers, but at least I'll still have them when/if our climate regains its sangfroid.
 |
| The Salvia leucantha and annual Lupinus 'Summer Spires' in these pots would produce more flowers in a sunnier spot but still look pretty spectacular in a lightly shaded position and require less water. September 2007 |
Saturday, 17 March 2012
Watering terracotta pots - not such a problem as you might think
My apologies for the length of this post, but I wanted to tackle this topic thoroughly...
Now that hosepipe bans are certain for many areas of the country from next month I can see that panic about terracotta pots may spread. I am tired of reading articles which baldly state that terracotta dries out much more quickly than plastic and therefore should be avoided. Time to stick my oar in.
Terracotta terror is unjustified
Visitors to the pottery sometimes assume that I spend all my time watering the 300-500 pots on display. In a typical summer I water 1-3 times a week, depending on the weather. After all I'm only there three days a week and I have plenty of other tasks! I do ask Babs to water at the weekend sometimes for me.
It takes about two hours to water the displays with water running at watering can speed from the hose. Some plantings may need an occasional top up from a watering can. I have about 200 pots at home and usually use a watering can with rainwater or water from the kitchen sink - it's manageable...
In my view it is not the pot material that makes the difference to the quantity of water needed, but the establishment and maintenance of correctly chosen plants.
An established planting in a high-quality terracotta pot does not dry out perceptibly more quickly than in plastic. In a plastic pot the sun heats the root ball more than in cool, porous, insulating terracotta and so it could be argued that more root damage and evaporation may occur. I have not tested this scientifically, but I have been working at Whichford Pottery for eleven years and was obsessed by gardening long before that: at the beginning of each summer I plant hundreds of pots and yes I use plastic at home (being a plantaholic I use anything) as well as Whichford seconds and I can truthfully say that I find the terracotta easier to look after.
When a planting has become well established the fine roots of the plants bind themselves to Whichford terracotta so that if the potful is allowed to dry out at all the rootball does not shrink away from the pot. In plastic the rootball shrinks and a gap is left all around the container so that most water arriving from above runs uselessly down the crack instead of soaking in to the compost.
Lining terracotta with plastic prevents the roots from binding on, denies the roots oxygen and can interfere with drainage - please don't!
I believe that the vast majority of water lost from an established pot is transpired from the foliage and relatively little is lost through the walls of the pot. Before plants are established and there is un-colonised compost in the pot it does more harm than good to have excess water sitting in the compost, so even in a warm summer good drainage (as in Whichford pots) is very important. Good drainage is sometimes confused with "drying out".
Plastic pots which are allowed to become somewhat dry are also likely to blow over and break precious plants.
Here are my tips for surviving a water shortage with a fine display of pots:
Location, location
Be aware of your garden's microclimates. Remember that pots, even big ones, are moveable! If watering is going to be tricky this year it makes sense to revise your usual display sites and if possible locate most of your pots in at least part shade, preferably keeping them out of the sun in the hottest part of the day (early afternoon). Put them within easy trudging distance of your water butts.
Put the right plants in the right location - sunlovers in sun, but leafy water-lovers with more shade. I'll go into plant choice in more detail next week.
Transpiration (water loss from leaves) rates go up dramatically in windy positions, so keep pots away from exposed sites if possible; bear in mind that walls can look sheltering but may create damaging turbulence and surprising dryness, especially near corners. Use semi-permeable barriers to reduce this effect - trellis, willow obelisks or woven screens, even garden benches can help.
Be aware that a shade-giving fence or house wall may also create a rain-shadow, so that a pot at the foot of the wall receives less of the precious wet stuff.
.
Volumise
Choose the biggest pots you can afford. The bigger the pot, the easier it is to look after - small pots have a much greater surface area to volume ratio and so will dry more quickly, they are also more fiddly to water.
When you plant a pot bear in mind the eventual size of the plants. My rule of thumb is that a certain volume of compost/roots will happily support up to about twice that volume of greenery, experience teaches you to vary this according to site and plant choice. It's particularly easy to get it wrong with vigorous climbers.
Most of our really big pots have a base ring which can be taken out so that large plants, trees etc can root through into the ground below to find more moisture. Bunny Guinness often recommends this. Of course you need to be very sure where you want your pot to be!
Group mentality
Clustering pots together creates a more humid microclimate around the display, slowing transpiration; they shelter each other from sun and wind and dry out much less quickly than a pot by itself does.
As the plants expand you can move them slightly further apart. A group is easier to water and has much greater visual impact too.
Compost considerations
I use a compost which is a mixture of peat, loam and grit. One feature of loam content is that it makes the compost easier to re-wet and the clay in the loam will hold on to moisture and nutrients. You can add water-retaining polymer granules but I don't because I like to keep many of my plants for overwintering and I find that the granules increase the likelihood of rotting in the winter.
I add a little slow-release fertiliser so that I won't have to use soluble fertiliser. I don't feed my plants much because I want them to be tough - I don't need them to be enormous and floppy, I want them to be strong, healthy and fairly compact, needing less water.
I keep watering to a minimum before the plants are planted in the pots too (without allowing them to dry out completely), and have always thought a little neglect now and then toughens plants up - it seems that someone agrees with me (click here to see an article on the possibility of training your plants to drink less)
Give them a good start
Fast establishment of summer plants is key. Thoroughly water the plants you are going to use, then leave them to stand for a couple of hours before you start. This means that the roots slide nicely out of the plastic without being damaged, and the root balls are soft but not waterlogged, so that the roots can carry on growing outwards to colonise the fresh compost without check. If you plant dry rootballs and water them in, much of that water will bypass the hard, dry rootballs and drain through the damp compost.
Make sure that all spaces between the plants are well filled in with compost so that there are no gaps and the rootballs are all covered, then water thoroughly immediately and check that the roots are still thoroughly covered. The surface of the planting should end up about 2cm/1" below the rim of the pot so that there is room to water without washing the compost out of the pot.
Mulchy, mulchy
If there is quite a lot of bare compost still to be seen when you have finished planting, a mulch of gravel, pebbles, grit, slate, glass nuggets etc will help to slow evaporation and will stop the surface of the compost from forming a hard cap which prevents water from penetrating easily.
I plant summer pots pretty densely, so that little compost is visible, the plants then knit together and shade the surface and ultimately the sides of the pot. Watch out for large-leaved plants covering the surface of the pot - you may need to water even after rain as they may act as an umbrella.
A proper drink
If your water authority allows it a drip irrigation system is really useful and economic. Ours has been ruined by dogs and utilities excavations, so currently I use the hose and watering cans. Make sure that enough drippers are placed in each pot to avoid dry patches. For the summer set the timer to work in the evening so that the water can soak throughout the potful and be available for all the plants before it starts to evaporate.
Whether you use a watering-can, a hose or an irrigation system the principle is the same. Give a good soak as infrequently as possible at a cool time of day. Do not allow pots to dry out between waterings as there will be run-off because a really dry rootball is hard to re-wet.
Do not water little and often as this will not encourage the roots to colonise all the available volume of compost and will encourage soft and unsustainable top growth. I count (to 60 for a medium-sized pot, 100 for a big one etc) to stop myself from moving on too quickly, and I water at several different points in larger pots.
I never use a spray or a rose, I simply have the water pouring gently and steadily so that the compost is not blasted out of the pot. I sometimes use my thumb to spread the jet slightly if I'm using a hose, the aim is not to wet the foliage and flowers but to get as much water as possible to soak in around the plant roots.
Vigilance!
To test whether a planting is dry do not just look at the surface. Observe the plants - are they turgid and happy looking or are they starting to wilt? Stick a finger right into the compost to assess its moisture content.
If you observe the state of your compost and plants regularly you will soon learn the warning signals. I use some plants as miner's canaries - I find Echium pininana and Salvia confertiflora are the quickest to show signs of distress, so if they have started to look sad it is time to get watering. This way you can avoid other plants get stressed and keep them flowering and free of powdery mildew.
Paradoxically, if a summer shower is predicted after a dry spell it may be worth doing a light water beforehand to make the compost surface more receptive and to make the plants turgid enough not to get broken by the downpour.
So please don't let the prospect of a hosepipe ban stop you from enjoying your container gardening - look on it as a challenge which will make us think more carefully about making the most effective use of any water we do use!
Now that hosepipe bans are certain for many areas of the country from next month I can see that panic about terracotta pots may spread. I am tired of reading articles which baldly state that terracotta dries out much more quickly than plastic and therefore should be avoided. Time to stick my oar in.
Terracotta terror is unjustified
 |
| July 2008 Happy plants in terracotta in our hot, dry stockyard. Not as difficult as you may think |
It takes about two hours to water the displays with water running at watering can speed from the hose. Some plantings may need an occasional top up from a watering can. I have about 200 pots at home and usually use a watering can with rainwater or water from the kitchen sink - it's manageable...
In my view it is not the pot material that makes the difference to the quantity of water needed, but the establishment and maintenance of correctly chosen plants.
An established planting in a high-quality terracotta pot does not dry out perceptibly more quickly than in plastic. In a plastic pot the sun heats the root ball more than in cool, porous, insulating terracotta and so it could be argued that more root damage and evaporation may occur. I have not tested this scientifically, but I have been working at Whichford Pottery for eleven years and was obsessed by gardening long before that: at the beginning of each summer I plant hundreds of pots and yes I use plastic at home (being a plantaholic I use anything) as well as Whichford seconds and I can truthfully say that I find the terracotta easier to look after.
When a planting has become well established the fine roots of the plants bind themselves to Whichford terracotta so that if the potful is allowed to dry out at all the rootball does not shrink away from the pot. In plastic the rootball shrinks and a gap is left all around the container so that most water arriving from above runs uselessly down the crack instead of soaking in to the compost.
Lining terracotta with plastic prevents the roots from binding on, denies the roots oxygen and can interfere with drainage - please don't!
I believe that the vast majority of water lost from an established pot is transpired from the foliage and relatively little is lost through the walls of the pot. Before plants are established and there is un-colonised compost in the pot it does more harm than good to have excess water sitting in the compost, so even in a warm summer good drainage (as in Whichford pots) is very important. Good drainage is sometimes confused with "drying out".
Plastic pots which are allowed to become somewhat dry are also likely to blow over and break precious plants.
Here are my tips for surviving a water shortage with a fine display of pots:
Location, location
Be aware of your garden's microclimates. Remember that pots, even big ones, are moveable! If watering is going to be tricky this year it makes sense to revise your usual display sites and if possible locate most of your pots in at least part shade, preferably keeping them out of the sun in the hottest part of the day (early afternoon). Put them within easy trudging distance of your water butts.
Put the right plants in the right location - sunlovers in sun, but leafy water-lovers with more shade. I'll go into plant choice in more detail next week.
Transpiration (water loss from leaves) rates go up dramatically in windy positions, so keep pots away from exposed sites if possible; bear in mind that walls can look sheltering but may create damaging turbulence and surprising dryness, especially near corners. Use semi-permeable barriers to reduce this effect - trellis, willow obelisks or woven screens, even garden benches can help.
Be aware that a shade-giving fence or house wall may also create a rain-shadow, so that a pot at the foot of the wall receives less of the precious wet stuff.
 |
| June 2009 Hostas do very well in Whichford Pots Here they enjoy the shade on the northern side of the Octagon but I have to remember that here they are sheltered from rain as well as hot sun |
Volumise
 |
| May 2010 One I got wrong. By the time the Humulus lupulus 'Aureus' had covered this obelisk there was too much foliage to be supported by such a small pot. I had to keep watering it, even after moving it from a much windier, sunnier location. |
When you plant a pot bear in mind the eventual size of the plants. My rule of thumb is that a certain volume of compost/roots will happily support up to about twice that volume of greenery, experience teaches you to vary this according to site and plant choice. It's particularly easy to get it wrong with vigorous climbers.
Most of our really big pots have a base ring which can be taken out so that large plants, trees etc can root through into the ground below to find more moisture. Bunny Guinness often recommends this. Of course you need to be very sure where you want your pot to be!
Group mentality
Clustering pots together creates a more humid microclimate around the display, slowing transpiration; they shelter each other from sun and wind and dry out much less quickly than a pot by itself does.
As the plants expand you can move them slightly further apart. A group is easier to water and has much greater visual impact too.
 |
| Sept 2007 This group faces south-west but is still luscious in late summer, helped by its own microclimate |
Compost considerations
I use a compost which is a mixture of peat, loam and grit. One feature of loam content is that it makes the compost easier to re-wet and the clay in the loam will hold on to moisture and nutrients. You can add water-retaining polymer granules but I don't because I like to keep many of my plants for overwintering and I find that the granules increase the likelihood of rotting in the winter.
 |
| These well-established plants (ALL in pots) are on a hot,windy corner but are not overfed and are surprisingly tough. July 2008 |
I keep watering to a minimum before the plants are planted in the pots too (without allowing them to dry out completely), and have always thought a little neglect now and then toughens plants up - it seems that someone agrees with me (click here to see an article on the possibility of training your plants to drink less)
Give them a good start
Fast establishment of summer plants is key. Thoroughly water the plants you are going to use, then leave them to stand for a couple of hours before you start. This means that the roots slide nicely out of the plastic without being damaged, and the root balls are soft but not waterlogged, so that the roots can carry on growing outwards to colonise the fresh compost without check. If you plant dry rootballs and water them in, much of that water will bypass the hard, dry rootballs and drain through the damp compost.
Make sure that all spaces between the plants are well filled in with compost so that there are no gaps and the rootballs are all covered, then water thoroughly immediately and check that the roots are still thoroughly covered. The surface of the planting should end up about 2cm/1" below the rim of the pot so that there is room to water without washing the compost out of the pot.
 |
| Sept 2009 The base of a standard holly tree, mulched with gravel and stones |
If there is quite a lot of bare compost still to be seen when you have finished planting, a mulch of gravel, pebbles, grit, slate, glass nuggets etc will help to slow evaporation and will stop the surface of the compost from forming a hard cap which prevents water from penetrating easily.
I plant summer pots pretty densely, so that little compost is visible, the plants then knit together and shade the surface and ultimately the sides of the pot. Watch out for large-leaved plants covering the surface of the pot - you may need to water even after rain as they may act as an umbrella.
A proper drink
If your water authority allows it a drip irrigation system is really useful and economic. Ours has been ruined by dogs and utilities excavations, so currently I use the hose and watering cans. Make sure that enough drippers are placed in each pot to avoid dry patches. For the summer set the timer to work in the evening so that the water can soak throughout the potful and be available for all the plants before it starts to evaporate.
Whether you use a watering-can, a hose or an irrigation system the principle is the same. Give a good soak as infrequently as possible at a cool time of day. Do not allow pots to dry out between waterings as there will be run-off because a really dry rootball is hard to re-wet.
Do not water little and often as this will not encourage the roots to colonise all the available volume of compost and will encourage soft and unsustainable top growth. I count (to 60 for a medium-sized pot, 100 for a big one etc) to stop myself from moving on too quickly, and I water at several different points in larger pots.
I never use a spray or a rose, I simply have the water pouring gently and steadily so that the compost is not blasted out of the pot. I sometimes use my thumb to spread the jet slightly if I'm using a hose, the aim is not to wet the foliage and flowers but to get as much water as possible to soak in around the plant roots.
Vigilance!
To test whether a planting is dry do not just look at the surface. Observe the plants - are they turgid and happy looking or are they starting to wilt? Stick a finger right into the compost to assess its moisture content.
 |
| The Echium pininana in the centre of this picture is looking quite happy... Sept 2008 |
 |
| But the Echium pininana here is beginning to look sad - I may have to water today July 2010 |
Paradoxically, if a summer shower is predicted after a dry spell it may be worth doing a light water beforehand to make the compost surface more receptive and to make the plants turgid enough not to get broken by the downpour.
So please don't let the prospect of a hosepipe ban stop you from enjoying your container gardening - look on it as a challenge which will make us think more carefully about making the most effective use of any water we do use!
Wednesday, 7 March 2012
The Whichford Hecklers - some more pottery people
 |
| The noisy people upstairs. Andy is on the left, Jeannette standing behind him, Simon is on the right and Hilary is falling out of the middle. |
I would like to introduce you to two of the mainstays of the pottery, if you collect Whichford pots you are quite likely to own one made by either of them - just look for a maker's mark at the base of the pot - one is represented by a fish, the other by some rune-like squiggles (crotchet rests?).
 |
| Andy back in the dark ages with sweet little Adam Keeling Adam is now a thrower at the pottery and married, with four children |
If you climb the stairs to the main throwing room the first person you are likely to meet is Andy Gill. This is apt because he has worked at the pottery for 30 years, almost since its foundation. I find it hard to imagine him as a teenage apprentice now but he must have been one once.
Nowadays you will hear him grumbling about his aching knees and shoulders, but he is young at heart, and a great cook and host with many friends and an endless stream of dodgy deadpan jokes. When you hear gales of laughter echoing around the pottery Andy is the likely cause.
Mention pies when you meet him and you'll have his full attention.
 |
| Simon singing at the staff barbecue in Jim's garden with Jake, who is Andy's son. |
At the far end of the room you'll find Simon Day, who also has about 30 years' pottery experience and has been at Whichford for the last eleven of them. He's a talented musician and every now and then he allows himself to be persuaded to bring one of his many guitars and play and sing for us at work. When we all went to Jim's house in France one year Simon's guitar and the Beatles Song Book came too and we sang raucously into the night. The neighbours must have loved it.
Mention fruit of any sort to Simon and he will talk for hours, and hours...
 |
| Statler |
 |
| Waldorf |
Muppets
Simon and Andy are a natural double act, if I need cheering up I just have to spend ten minutes with them to find my laughter again. During the summer they will lean out of their windows and hurl abuse at me like Statler and Waldorf from the Muppets, so don't be startled if you arrive to find the gardener apparently shouting into thin air, I haven't been drinking, I'm just dealing with hecklers.
Hands on
It is Andy who teaches throwing at the one-day pottery workshops here and he's a patient, friendly and funny teacher. All the makers here are friendly so if you come and have a look round they will be pleased to explain what they are doing if they have time, although sometimes they are under pressure for a big order or need to concentrate on a tricky process, so may not have time for a long chat - but we are all proud of the standard of craftsmanship here and would like to show you what goes on.
 |
| Tandem pot throwing |
I have only ever had one go at throwing a pot (and produced one small, wobbly pot with a lot of help) but this was enough to show me how physically hard this must be to do all day. The clay is heavy, cold and wet. It looks smooth but it contains grog (see my post about the clay) so as it spins it feels like wet sandpaper, you have to apply a deceptive amount of force to shape it, which is hard on the fingers, wrists, elbows, shoulders, back... And a moment's inattention can have the whole thing collapse back into a blob.
These two make it look easy. They can even throw in tandem (see left) or with their feet (click here).
 |
| Making the top section of a rhubarb forcer |
Size matters
Andy and Simon both make a wide range of items, but Andy's speciality is the two-piece pots. These are usually about 30-36" diameter, using up to 120 lbs clay in total. Andy throws the bottom half of the pot and transfers it to another wheel, then throws the top half to exactly the right size and fits it to the bottom section. Sounds simple? Not many people can do this.
He has also designed some of the pots in our range, including the best-selling Buxus pots.
I am adding making videos to YouTube - click here to see Andy in action.
Andy makes our famous rhubarb forcers, which can be seen in both humble and prestigious gardens all over the country, including Raymond Blanc's Le Manoir aux Quat'Saisons. He has started making extra-large ones now, so even bigger clumps can be forced for tender, sweet stems.
 |
| Checking the finished height of an XL rhubarb forcer |
 |
| It's very hard to photograph throwers without making their elbows look huge! |
Small but beautifully formed
Simon makes a wide range of flowerpots, usually smallish to medium size. We like to tease him that he can't make big pots but of course he can. He also makes lovely mugs and so-on at home, I have a gorgeous, rounded blue one which is a pleasure to drink from and I get VERY ANGRY if anyone steals it at break time!
 |
| Simon throwing - note the high tech measuring device (a stick) |
Both men are very disparaging about their own talents in that peculiarly British way, but both have extremely high standards and a quiet pride in their work. Just don't tell them I said that when you come to visit...
 |
| Give us a lift! Even medium-sized freshly-thrown pots are extremely heavy |
Monday, 27 February 2012
Smiling crocus, scouting bees, and how to rustle up rustic willow obelisks
Last week gave us an early taste of spring: on Thursday larks sang all day over the fields surrounding the pottery and one of the local buzzards could be heard gliding overhead, shouting "Wheeee!"
Nowadays, when I wheel a barrowful to the bonfire or the compost heap I am greeted by inquisitive lambs, who tiptoe towards me and then boing away. What could be more springy than that?
 Here is a step-by-step guide to willow obelisks, Harriet-style:
 2* Take two smaller withies and, with one either side of the base of one of the uprights, hold them near the fatter end and twist them around each other a couple of times. You will find that once twisted together it is easy to make them grip the base of the next upright. I'm sorry this is hard to describe without diagrams or videos, but you'll just have to experiment!


You may need to push and pull a bit to make them curve (depending how flexible your willow supply is) and you may need to pull uprights back or forth to keep them relatively evenly spaced.


 ...This is much stronger and looks neater:

 7* Now trim the whippy ends off the top of the obelisk
I usually wrap a small withy vertically around the join at the top, it helps to keep the uprights spaced. You can add several and make a wicker ball at the top.
 8* Tuck in any thin ends that are loose and trim off any ends that stick out of the obelisk. Don't cut them too close to the obelisk in case they come loose as the structure dries and shrinks slightly.
 9* Admire your handiwork then extract the obelisk from the pot (if you are using the 'empty pot method') and trim the bases of the uprights at an angle so that they are all the same length and nice and sharp for easy insertion in compost.

Right, now go and sow some more seeds!
 |
| Crocus tommasinianus var. roseus |
 |
| Crocus 'Whitewell Purple' and bee in an Olive Pot |
Woggle Dance
Crocuses have been jumping up and stretching their arms out wide in the sun to welcome grateful emergent bees. There is a row of hives in a field above Whichford, I suspect their bee scout brigade (motto "Bee Prepared") has identified us as a good source of pollen and nectar. They have been visiting us since January in mild spells and last summer the place was knee-deep in them, plus assorted bumblebees.
 |
| Crocus sieberi subsp. sublimis 'Tricolor' plus bee |
Nowadays, when I wheel a barrowful to the bonfire or the compost heap I am greeted by inquisitive lambs, who tiptoe towards me and then boing away. What could be more springy than that?
 |
| Lambs at Whichford Pottery |
 |
| Lathyrus 'Goldmine' emerging last week |
Sowing for summits
Of course the biggest treat for gardeners at this time of year is the orgy of seed sowing. I like to sow plenty of climbers, and tend to do most of these relatively early so that they are well-developed before planting out. In addition to the obligatory sweet peas I have Asarina 'Blue Yonder' emerging, Cobaea scandens should be next, and there will be more after that.
Luckily I have recently finished giving the willow arbour its yearly haircut and I now have three good heaps of willow prunings of various calibres.
 |
| The freshly pruned willow arbour at Whichford Pottery |
Obelisks and Asterisks
It makes sense, then, to cobble together a few obelisks for all these climbers while the withies are still relatively bendy. This is a vigorous willow more suited to large structures than to small-scale weaving, so my creations are never neat and tidy but they look pleasantly rustic, they serve a purpose, and they are free! Here is a step-by-step guide to willow obelisks, Harriet-style:
1*To fit a pot approx 18 to 22" in diameter, select six sturdy uprights. I have used a pot within a pot to hold them steady, but you could just insert them into a pot that is full of compost.
Insert them, as evenly spaced as possible, and tie them together at the desired height (mine will have a finished height of about 6 feet/2m).
 2* Take two smaller withies and, with one either side of the base of one of the uprights, hold them near the fatter end and twist them around each other a couple of times. You will find that once twisted together it is easy to make them grip the base of the next upright. I'm sorry this is hard to describe without diagrams or videos, but you'll just have to experiment!
 *@! There may be some swearing at this point.
. 

3* Working from the fat end towards the thin end, twist the pair of withies together and work upwards in a gentle spiral, twisting them around two or three times between each pair of uprights and incorporating the uprights as you go.
You may need to push and pull a bit to make them curve (depending how flexible your willow supply is) and you may need to pull uprights back or forth to keep them relatively evenly spaced.

4* If a withy snaps half way, you can just start another pair of withies immediately above it and wind the ends of the first pair around the second pair.
The same goes for when you are getting towards the thinnest end of the first pair, just start another pair right on top of it and wind the thin ends of the lower pair around the upper pair. From a distance you'll hardly see the join because later on you will trim off any untidy bits that stick out.

5* Every time you select a new pair of withies try to get a pair that matches in thickness and length otherwise you will get a twist that looks like this:


6* Stand back every now and then to check that the spiral is progressing smoothly. On an obelisk this size I try to keep the layers about 4-6" (10-15cm) apart. Making them closer together is not necessary for strength and will cut out a lot of light to the young plants.
Select thinner, more pliant withies as you reach the narrow top, you may find at this point that it is not possible to incorporate every upright. This is fine, because by now the structure is strong and rigid. 7* Now trim the whippy ends off the top of the obelisk
I usually wrap a small withy vertically around the join at the top, it helps to keep the uprights spaced. You can add several and make a wicker ball at the top.


Right, now go and sow some more seeds!
Subscribe to:
Posts (Atom)