Gorn! And never called me Mother!
Hot weather and wind has done for 'Prinses Irene', she has a severe case of alopecia. 'Backpacker' has been fried and 'Princesse Charmante' is a distant memory. 'Mount Tacoma' is ageing in a pleasantly blowsy way but isn't long for this world.
 |
| Tulip 'Mount Tacoma' |
Last tulips standing
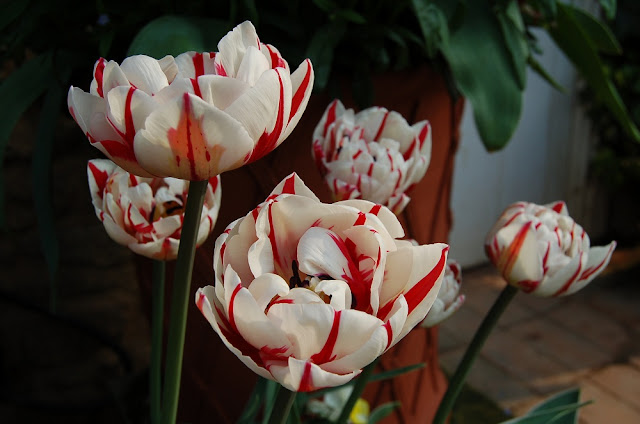
There are some tulips which get going a bit late and I am grateful for this because the hot weather could have meant that tulip time was a bit of a flash in the pan this year. 'Carnaval de Nice' is looking fresh and crisp at the moment.
 |
| Tulip 'Carnaval de Nice' in the Basket pots outside the store-room |
It does have a tendency to lean out of the pot but it rarely snaps and I enjoy the way tulips like this can bend and twist around. In the case of 'Carnaval de Nice' it means that you often get a good view of the beautifully painted back of the flower.
 |
| Tulip 'Carnaval de Nice' |
'Esther' is still looking perky. This tulip has beautiful blue-green blotches inside the flower, it's always worth looking inside tulips because there is often a bonus colour hidden there.
 |
| Tulip 'Esther' |
So some tulips are still hanging on and with a bit of luck there will be plenty left for the participants in Liz Eddison's photography course here on Saturday. There are also trilliums, alliums, arisaemas, violas, pansies, wallflowers, echiums, alpines, daisies....
 |
| Tulips 'Picture', 'Esther' and 'Blushing Girl' |
 |
| Fresh Hostas in Hosta Pots |
We mustn't forget the fresh limey greens that make the spring palette special. I have a collection of hostas, mostly in our Hosta Pots (the shape shows them off and snails really hate climbing the overhang!) and having just unfurled they are at their brightest. Most of the variety names are lost in the mists of time but who cares?
Getting warmer.
Unfortunately even in the unseasonably hot weather I have been sweating in the greenhouse. Seedlings are still spewing out of the propagator and I am having trouble potting them up fast enough. We are now getting to the stage where the only way to get from one end of the greenhouse to the other is sideways and holding your breath.
So here is my basic pricking out technique:
I use 9cm pots and usually work in batches of twelve, pricking out three or four dozen plants of each variety. Here I shall be working on Amaranthus 'Illumination'. As a general rule the younger the seedling the easier it is to prick out, as the roots will not have branched out and tangled together. Try to do the pricking out before the roots reach the bottom of the seed tray.
1. Scoop compost into the pots and tap each one twice on the bench to settle the compost down. Sweep the excess off with the flat of the hand but do not press down on the compost. Fill a whole batch of pots this way.
2. I often sow seeds in the trays that bedding plants come in so that it is easy to remove a small batch at a time. If using a normal seed tray gently ease a managable chunk of seedlings out and work on that rather than trying to dig each seedling out individually.
3. Now gently split this chunk into smaller chunks, taking care to ease the compost apart. This compost is a bit wet; it is easier to crumble the seedlings apart if the compost is not too soggy but it must be damp or the roots and particles of compost will cling together and have to be ripped apart.
4. Gently squeeze the chunk of compost so that it starts to break apart. You are aiming to tease out an individual seedling with as little damage to the root as possible.
5. Now you can ease away a seedling. Handle it only by its seed-leaf (if you damage the stem it may not recover). Try not to break those roots. It should come away with only a little compost clinging to the finest roots. You'll get better at this with practice!
6. Make a hole in the compost with the forefinger of your other hand big enough to accommodate the seedling's roots and lower it gently in. The roots need to drop into the hole without being folded upwards.
7. Lower the seedling in until it is very slightly deeper than it had been in the seed tray then firm the compost around it very gently. Tap the pot on the bench a couple of times to settle it in. Pressing on the compost squeezes the air out, tears those fragile roots and may damage the base of that delicate stem.
8. Place the pots in a couple of inches of water and leave only until moisture is just beginning to show at the surface then remove promptly. It should only take a few minutes. Watering from above tends to squash the seedling into the compost and may even break it.
9. Put the pots in neat rows on the greenhouse staging. This is not just for your own satisfaction, it is much easier to water straight rows of pots consistently. Don't forget to label each batch.
10. Watch them grow!
 |
| Seedlings and cuttings in the greenhouse this week |


No comments:
Post a Comment